December 20, 2012

Guest Post: Merry Christmas

Christmas is quickly approaching, and in the midst of the holiday madness, I moved from Georgia to Florida. Things have been crazy to say the least, but posts should be returning to normal after the holidays. I hope you all have a wonderful Christmas with your loved ones. Below is Tyler's Christmas guest post, Enjoy!!


Christmas is my most favorite time of the year.  I'm one of those people who have no issue with Hobby Lobby setting out their seasonal decor in June - I even get excited for Christmas when it's 90 degrees out.

So when the Yuletide finally gets here, I feel very festive and can't wait to start decorating.  To me, nothing replaces a real tree (the smell is amazing).  However, this year we got a fake tree so that we could keep it up and enjoy it a little longer (we found it on sale at Target).
I wanted to go with a little less traditional color scheme and in came the white, silver and black.  Most of my ornaments were purchased at HomeGoods and Target.  Otherwise, a few came from some specialty shops throughout the year. My tree topper came from West Elm and I love that it makes such a statement.
For my mantle, I wanted to go with a simple design.  I found the three trees at Target and used apothecary jars that I already had and pinecones from around my yard.
For my stairs, I used garland and wreaths I ordered on sale from Christmas Central.  I used black ribbon to coincide with the black ornaments.  I love that it isn't a typical Christmas color, but still looks festive.
I hope you all have a beautiful holiday!

December 6, 2012

Getting into the Holiday “Spirits”


Becca never ceases to amaze me with her endlessly creative projects. Drink up, y'all!

After relentlessly searching the Internet for “decanter labels” and “decanter tags” and coming up with meager results, I took it upon myself (and my creative boyfriend, Justin) to make them ourselves. I knew I wanted a rectangular shape and bronze/gold color. My first thought was to find really small picture frames to use as the label holder. Luckily, it is the perfect time of year as there were many small ornament frames to choose from. I was excited to find what I wanted at Michael’s; although, they were larger than I would have liked. But at $3.33 each, I couldn’t pass them up. As you can see, they had a red ribbon but I wanted to change it out with something more interesting so I purchased a 36” inch chain for $8 from Michael’s.
For the next step, Justin designed and printed labels with some direction from me J. Even if you don’t have access to a graphic designer, you can print templates online or even hand write the labels to add a more personal touch.
I cut out the labels to the correct size and inserted them into the frames. I then cut off the red ribbon and cut the chain to the desired length. It is important to measure the length of the chain, so you know exactly where you want the label to fall. I actually purchased a jewelry connector kit that I ended up not needing since there was already a small connector on the frame. Because of this, I was able to hook the chain to the existing small ring connector and hang the label from each decanter.
I’ve been collecting interesting decanter bottles for sometime now and am happy to have finally filled them up with good spirits and label them properly. Now our friends and guests can easily concoct their favorite drink at our bar cart. Cheers and happy holidays!

December 4, 2012

Tuesday Ten: Christmas Decor

Christmas is one of my favorite times of year. From quiet nights in front of the tree to elaborate holiday parties, Christmas is the season for cheer. I love the feeling I get when I walk into a room that's all lit up with Christmas character, so today's Tuesday Ten features a few of my very favorite ideas for incorporating a little sparkle into your holiday decor. Enjoy!

1. Add sparkle. Think outside the tree when stringing your lights this year. Lining a mirror can be a great way to add a little ambiance, or a string of lights around the fireplace can set the stage for cozy evenings.

2. Think Thrift. Don't spend a fortune on decor. Pinterest can be an amazing resource for ideas and thrift stores can help bring those ideas to life on a budget. I got a group of these Christmas trees at a thrift store last summer for a quarter each. Some quick spray paint and they make an awesome centerpiece. Same goes for old candlesticks, bottles or ornaments.

3. Get Crafty. Draw a Christmas tree on contractor's paper and just add ornaments, or string your favorite old holiday cards together for a quick take on garland.
4. Bring the outside in. Spray painting twigs and berries can be a great and inexpensive way to incorporate a little nature into your home for the holidays. This can be especially nice if you use a fake tree. Or pick up a real wreath to hang indoors so you still get that yummy Christmas smell.
4. Set the table. Even if you head to someone else's house for Christmas dinner, setting your table can be a fun way to fancy things up. Or if you host a holiday party at your place, go all out with a festive table setting. Your guests will love that you went the extra mile.
Most importantly, soak up this special time of year by spending it with family and friends and making memories that will last a lifetime. Happy December, y'all!

November 27, 2012

Guest Post: Architectural Salvage

Hello again. I'm back today with a great post about repurposing old pieces and incorporating them into your home's decor. Amity really has an eye for antiques. Enjoy!

As you can tell from many of Danna's blog posts, she's a huge advocate of turning something old into something new. It seems as though that runs in the family because, over the past several years, I've developed the same passion for incorporating architectural elements or remnants of larger pieces of furniture into my overall decor. Sometimes those pieces are the main focal point of a room, while other times, I use them as a minor piece of flair. 

I have a couple of pieces of advice when you're looking for architectural pieces. First of all, imperfection is ok. In fact, it's almost encouraged. If you buy two coordinating pieces, they don't have to look exactly alike. If the paint is chipping, it adds character. Secondly, if something strikes your eye but you don't know where in your house you'll put it, buy it anyway. You will always find a place in your house for something you love. My mother gave me that tip years ago and it's never steered me wrong.
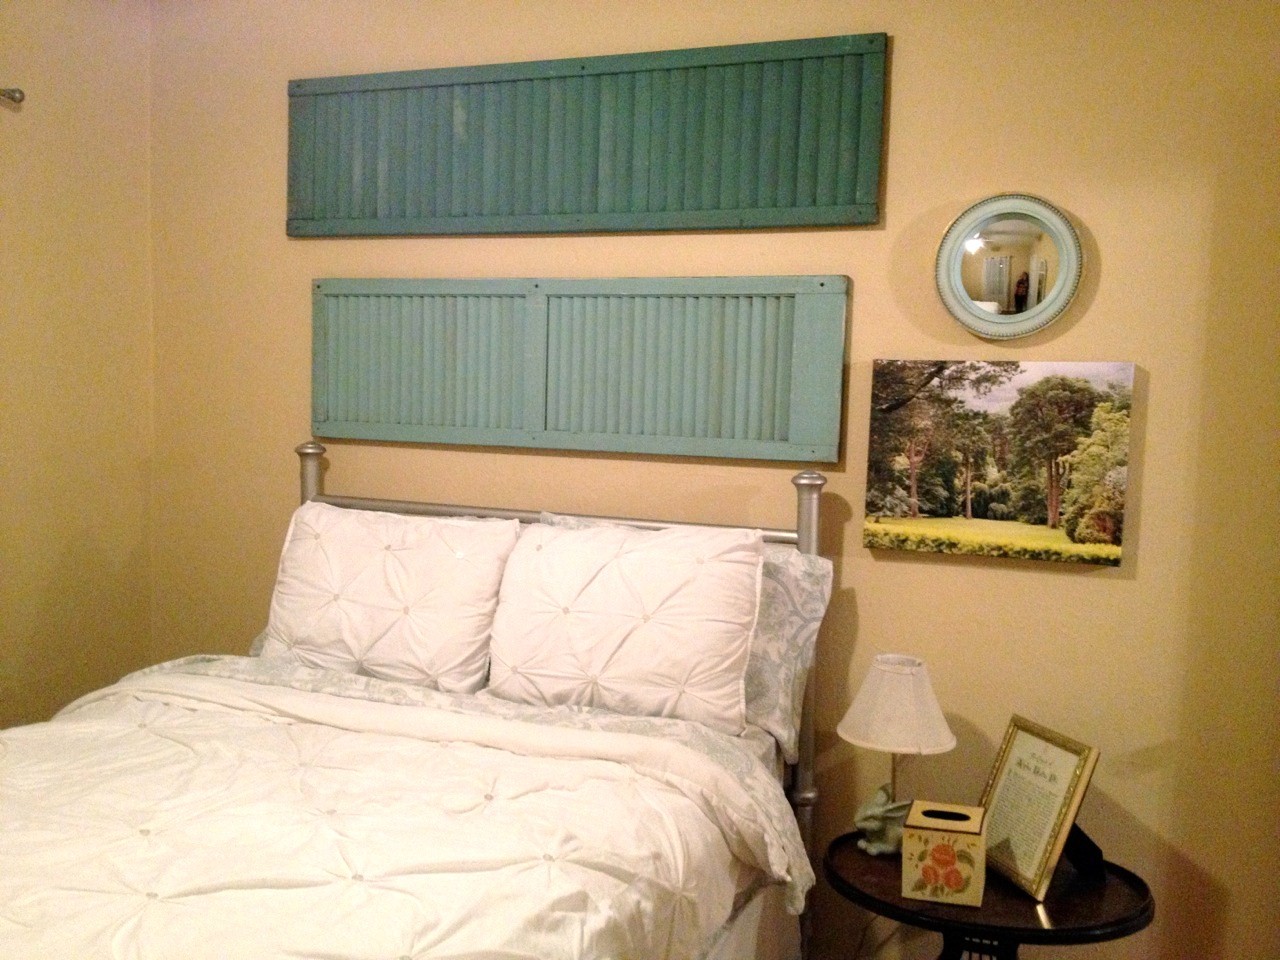
I have two sheds in my back yard that weren't emptied by the home's previous owners. Danna and I discovered some hidden gems one Christmas, and just recently, I finally made use of some old mismatched shutters. They were all painted a similar blue/green but were all different styles and sizes. I decided to clean a couple up and hang them above the bed in my guest room. After several attempts and a few choice words between me and my boyfriend, the shutters are now the main focal point in the bedroom. They accompany a canvas photograph I bought at an art auction and a Federal-style mirror finished with pale blue and gold. I also gave three of them to my mom who hung them above the bed in the master bedroom at my parent's lake house. They work vertically or horizontally and can be used as a headboard replacement or hung above the headboard. 
If you recall my first guest post, I have a collection of old bottles in my living room that are displayed on what looks like a mantel. I actually think it's the top of a dining room hutch, but I don't know for sure what the piece of furniture is. All I know is that when I saw it in an antique store in Havana, I knew I had to have it. To be honest, it wasn't in the greatest shape. I reinforced the back of it with a slim piece of wood before hanging it because I certainly didn't want it to fall on anyone sitting in the chair underneath it.
One of my favorite pieces in my house is a Chinese red bench that sits just next to my entrance. I bought it from Southern Chicks in Tallahassee. I can't say enough great things about Bobbi and her handiwork. She made the bench from a headboard and footboard of a twin bed. With just a little imagination and a few extra pieces of support wood, she made an incredible piece of furniture from a hand-me-down bed. 
I have several other little pieces around my house that had different functions in their previous lives. The basket that holds my magazines and throw blankets (next to my couch) used to be a mailman's bicycle basket. The old mailbox that hung on my front porch now hangs in my dining room. Former wrought iron grates with a peacock motif now flank either side of my living room windows. My coffee table is my grandmother's former bedroom cedar chest. 
As you can tell, I try to purchase pieces that have a story or will act as a conversation starter. My goal as a homeowner and decorator is to assemble a mix of old and new that live harmoniously in one space. It'd be terribly boring to spend all of my time at Pottery Barn and no time at Second Hand Sandy's :)

November 15, 2012

Guest Post: Feathers and Leather

Today, Ashlie is sharing with us how to make an amazing dream catcher using supplies from the craft store. I can just see a few of these in a cluster hung from the ceiling in the corner of a room. I might even put a holiday spin on this. Hope you guys enjoy this project, I can't wait to make my own!


The Dream Catcher

According to Native Americans, dreams that humans have while they sleep, are sent by sacred spirits as messages.  According to their Legend, in the center of the Dream Catcher there is a hole.  Good dreams are permitted to reach the sleeper through this hole in the  web.  As for the bad dreams, the web traps them and they disappear at dawn with the first light. For some, they try to determine what messages are being passed onto them and what the message represents. 
Materials (all purchased at Hobby Lobby) 
Assorted Feathers, Bronze Colored Bird Charms,  Black Coated Cording, 
Metal Craft Hoop, Suede Cording, Thick Suede Strips
Start out by securing the cord to the metal hoop and begin weaving or webbing the cord in and out of the hoop. Free hand your cord to see what design you end up with or weave a pattern. The best thing about this project, is that you can't really go wrong. Complete customization. 

Next, wrap the suede cord around the hoop. 
 Once covered, it is time to customize your sweet dream weaver.
I will say that the decoration portion of this project can be a bit tedious, but hopefully the finished product will be well worth it.
I decided to use my new trinket as a festive door hang...
Sweet Dreams are made of Feathers & Leather!

November 14, 2012

Reveal: New Entry Table

I'm so excited to share this reveal with you guys. I've been working on it for some time now, and couldn't be happier with the way it turned out. Especially considering I only shelled out $15 to make this baby mine. She was just begging for an extreme makeover, so that's what I gave her.

Can you believe I found this gem for $15?! There was absolutely no way I could pass it up. When I bought it it looked like this:
I found a gallon of orange paint in the oops section at Home Depot a while back and decided to use it on this project. But after working my paintbrush through all the detailing on the front of the piece, I decided this orange would only serve as the base coat, for two reasons. 1.) I hated how long and labor intensive it was to meticulously paint every groove and 2.) I wasn't loving the color.
So I picked up a couple cans of Rustoleum's Paprika (a beautiful mix between orange and red) spray paint. I started by removing all the hinges and taking off the doors, since I could paint around them when using a brush, but wouldn't be able to spray around them. It only took two cans since I had  the base coat on there beforehand. I just applied light even coats until she was completely covered. After the first coat it looked a little like this:
But after multiple coats, she was a bright shining star. And I was in love. Of course, by this point in my mind, I had already styled her in four different places in my home (as a TV stand, a welcome table in my entry, my new bar, and extra storage in my bedroom).
After I had all the coats on the doors and the body, I applied a top coat of polyurethane. I use Rustoleum for this and always use the brush-on as the spray-on gives a blotchy finish. I can't vouch for other brands because this is what Home Depot, my number one go to store, carries. And a huge shout out thank you to Amanda for the Home Depot gift card, it was used well :).

And here she is in all her glory. Sorry for the terrible photos, the rays of sun that come into the entry spliced up the shot a bit and my second attempt was at night when there was no natural light so the color is definitely reading a little more red in those photos than it actually is. I had so much fun with this project, what do you guys think? Not too shabby for about $25 total!

November 7, 2012

Guest Post: Rustic Caramel Apples


Hey guys, I cannot believe it is already November, and Thanksgiving is right around the corner. Tyler has a great tutorial on candy apples for us, which are a quintessential part of the holidays for me. Hope you enjoy!

Halloween may be over, but fall is in full swing - so I feel like it's still appropriate to enjoy caramel apples...and a few extra viewings of Hocus Pocus :)
 
Last month, my good friend B hosted an amazing Halloween carnival for her daughter's sixth birthday.  She asked me if I could make some caramel apples and I jumped at the chance.  We decided on two types: a traditional caramel apple with a Butterfinger topping and a candy melt apple with crushed Oreo topping and chocolate drizzle.
 
B wanted a chic and rustic presentation, so I inserted carved sticks into the apples.  I went with Granny Smith apples for the color and used the following recipe for the caramel apples:http://allrecipes.com/Recipe/Caramel-Apples/
 
Once I dipped the apples, I set them on wax paper to dry.  Before they were dry, I spooned crushed Butterfinger (I used my food processor for this step) on to the top of the apples. 
After the caramel apples were done, I created my own version of candy melt apples.  I used white candy melts by Wilton (which I purchased at Michael's) and they worked out perfectly. I followed the same process with these apples as I did for the carameled ones (aside from rolling the apples in the crushed Oreo, instead of spooning the topping on).  I drizzled chocolate sauce on a few for extra detail.  I allowed all the apples to set overnight.
Lastly, I bagged each apple individually so that guests could take them as favors (I used cellophane bags and twine to tie them).  I'll be honest, this step was a two person job as the apples easily got stuck to the sides of the bags (thank you to my husband who helped me with this!).  If you aren't using the apples as favors, setting them on a platter is easier and makes for a beautiful presentation.  Enjoy!