July 30, 2012

Reveal: Thrift Store Chair

Happy Monday, everyone! I'm posting from California this week, so posts are coming a litte later than usual. If you all remember from last week, I briefly talked about a few pieces I found while thrifting in North Carolina, namely this amazing chair I got for $6!
Well, of course I changed it. The fabric was in great condition and having reupholstered an arm chair before and knowing the amount of work it takes, I was happy to leave this one in its current skin. I decided to dip-dye the legs with a cool aqua to bring some much needed color into the drab chair. This helped a lot.


But it still needed some work. Last week I picked up some nailhead trim for another project (which you'll see later in the week) and decided to add some to the arms of this little chair as well. A faux sheepskin and a cute pillow later, I have a gorgeous addition to my living room that set me back a total of $9. Can't beat that!


Thanks for reading, Please let me know what you think of this thrift store redo in the comments section below. I hope you guys have a great week!

July 26, 2012

Introducing...

When I started this blog a couple weeks back, I knew I'd really have to bring the heat to even be able to think about competing in the highly competitive environment known as blogland, especially as a designer wanna-be. So in an attempt to bring you endless creativity and fresh perspective, I recruited a few of the most talented people I know to bring you a new series of guest contributors. They'll be taking over my Thursday posts through December and I can't wait to see what they have to share with you guys.

So, without further ado, I'm so excited to introduce my new creative team:

Rebecca VanLandingham
A vintage lover and style connoisseur, Becca has transformed her cookie cutter townhouse into a shabby chic dream home. From rustic red to metallic matte, she uses an eclectic mix of colors to create inviting rooms. She has a keen eye for beautiful design and joins the Trimmed and Tailored team to provide inspiration for stunning spaces.


Tyler Browning
After recently buying her first home with husband David, Tyler immediately started getting her hands dirty in projects. Her fun and organized style are effortlessly chic and inspire endless creativity while still maintaining a crisp feel. Her passions include entertaining, baking, and re-purposing items for her home. Tyler joins the Trimmed and Tailored team as a monthly contributor through December.

Ashlie Carter
A creative mind paired with a fun, eclectic style makes Ashlie the perfect addition to the Trimmed and Tailored team. As a guest blogger through December, Ashlie will be sharing her own design details as she and hubby Lee embark on transforming their starter home into their dream home.

Amity Gay
Having an eye for all things beautiful, Amity jumped into the pool of home ownership in early 2010 and has spent a ton of time (in between attending a million weddings) bringing fresh style into her 1949 cottage. From antique hand-me-downs and vintage finds to HomeGoods accessories and custom furniture, she perfectly pairs old and new to create a warm and welcoming home.

I will still be posting Mondays through Wednesdays, but these fine ladies will be doing all of the Thursday posts starting next week.  Make sure to tune in, you're not going to want to miss their great tips for incredible style!

Have a wonderful weekend!

July 25, 2012

The Thrill of Thrifting


Finding beauty in something unlikely is my main attraction to thrifting. It’s an addiction. By simply thinking outside the box, you can easily breathe new life into old pieces and transition them from thrift store trash to a beautiful addition to your home.

This past weekend I did some thrifting in my all time favorite thrift location of Waynesville, North Carolina. For some reason, the prices in North Carolina are unbeatable and I always find amazing pieces that I can’t wait to incorporate into my home. This trip was no exception. Below is a small sampling of the things I picked up.
 When thrifting, it is essential to keep an open mind. Something like this can quickly become overwhelming:

Try to stay focused and pick up broad pieces you can easily incorporate into your own home. Items I regularly look for at a second hand store include: vases, china, storage bins, frames, lamps, mirrors and linens. I also have found my fair share of amazing chairs, but it is important to inspect the fabric really well to make sure there are no tears or small holes, which could be an indicator of bugs. Whenever I bring anything home from a thrift store, I ALWAYS soak items really well, wash linens twice, and shampoo/steam clean and vacuum covered items such as chairs and couches.


About 99% of what I pick up at thrift stores, I change with paint or fabric, but occasionally you can find a true diamond in the rough. The point is, try to imagine something in a different color or texture. For example, these frames look like total trash, but recovered and repainted, they are suddenly wall ready. (Sorry about that flash reflection).
I love Restoration Hardware, West Elm and Anthropologie as much as anyone, but who can really afford their stuff? By using great furniture stores as inspiration and shopping thrift, you can achieve a very similar look for much, much less. And you can even afford to change things up when you get sick of them.

Make sure to tune in next week when I reveal how these thrifted items are now making themselves at home in my apartment. Also, I have some really exciting news to share with you guys tomorrow, so stop in and join the fun!

Follow me on twitter @trimandtailored, and don't hesitate to email me with any questions or ideas at trimmedandtailored@gmail.com.

July 24, 2012

Combating Clutter


Controlling clutter can be a difficult task, especially if organizing isn’t your thing. However, being organized is really the secret to getting more crossed off the to-do list each day, and isn’t that everyone’s ultimate goal?
So I’ve put together a few simple steps to follow to combat clutter in your space.

1.)    Remove everything from the room you’re working on.
2.)    Group like items together.
3.)    Use baskets, bins and drawers to fill the now-blank space.
4.)    Bring items back into the space in their new groupings.
5.)    Everything has a place.
6.)    Maintain.
Following these simple steps will ensure a clutter free home initially, but step number 6 is the most important of all. Each day, make sure to allot some time to put things back in their place, whether it’s the end of a work day, before bed or first thing in the morning. I personally do it before bed, so I wake up with a neat and organized home and my mind is free to focus on my day rather than my clutter.
 Happy Organizing, friends!

July 20, 2012

Creating an Outdoor Oasis


Yesterday I drove three hours north to my aunt and uncle’s summer home nestled in the mountains of Maggie Valley, NC for a little weekend R&R. Their house is surrounded by mountains on all sides and has a swiftly flowing creek in the backyard that provides the perfect backdrop for morning coffee on the porch. And windows are left open to allow the creek to lull them to sleep at night. Oh the life.
They bought the land nearly 15 years ago and had their house built by the creek. Together, my aunt, an avid gardner, and my uncle, a doting birdwatcher, have worked in the garden every summer creating an incredibly serene outdoor oasis that is an ode to nature.
When creating an outdoor oasis, it's important to incorporate items that reflect nature. Remember to vary finishes, as it's an easy way to put a fresh spin on vintage charm. I love how she combines this vibrant butterfly with a rustic plant stand in the same space, and these sun yellow Adirondack chairs are the perfect spot for taking in the gorgeous mountain views.
It is such a beautiful place, and the peaceful bliss that comes from the creek makes me wish I got out of the city and into the country more often. I hope you guys have a wonderful weekend!

July 18, 2012

Design Dilemma


Have you ever attempted a design and then immediately regretted it? Or painted an empty canvas and wished it was just white again? Luckily, most design disasters can be fixed. But sometimes, you just cannot undo something, so you have to make it work.

Point in case, my mom gave me a frame a few years ago that I thought she just didn’t want anymore. So I got busy slapping some paint on it and making it my own. I’m a firm believer in one person’s trash is another person’s treasure. I used that frame to create a shabby chic frame wall that I loved. When my mom came to visit a few months later, I suddenly found myself regretting my decision to paint that wooden frame.

What she failed to tell me at the time, or what I failed to really hear (she sees one side, I see another) was that her father built that frame more than fifty years ago, and she had given it to me as a piece of him to keep forever. He passed away when my mom was only 19, so it broke my heart that I had hurt her by repainting it. 
This was old barn wood, and sanding it to remove the paint would destroy the textured finish of the wood, so I was left to live with my way-too-modern, now-black barn wood frame. I put it away for a while, because looking at it reminded me how sad my mom was about my refinishing it, but last week I brought it back out, determined to make it work and love it. I wanted this frame that had been in my family for years to be a part of my daily life. So I decided to lightly sand it with very low grit paper as to not remove the finish and just slightly remove some of the paint. A black-meets-brown rustic wood if you will. (totally natural, right?) The result? A beautiful frame I now love again and smile every time I walk past. It’s a small piece of the grandfather I never knew smiling back at me.

The lesson here is make items in your home work for you. Just because you change an old piece that might have special meaning to you and your family, doesn’t mean you aren’t still loving it. You’ve just breathed new life into it. And that’s ok. Times change and people change too, and if you leave everything the way it once was, you might not remember to see the beauty in it. So refresh by refinishing, and love it for a long time; and when you're ready, change it again.

July 17, 2012

Drop Cloth: An Affordable Alternative to Linen


A few months back, while reading Country Living Magazine, I came across a makeover that featured an incredible home designed on a budget. My kind of read. The homeowner used canvas drop cloth (from the hardware store!) to recover her living room furniture. Since then, I have been excited to try out drop cloth, and this past weekend I got my hands dirty. I picked up a huge piece of drop cloth for right around $30, with the intention of making curtain panels. I have read that Home Depot is a better fit than Lowe’s in the drop cloth selection, as Home Depot’s cloths do not have seams running through them and Lowe’s do. Mine did, but that didn’t really bother me. I also found that if you buy the smallest size, it is pre-hemmed at right about the size you would need for one curtain panel, so if sewing isn’t your thing, this would be the one for you. I don’t mind hemming edges, so I bought the big size to save some dough and maximize the fabric.

The first thing you want to do is wash and dry the fabric to remove the stuffy smell and preshrink the fabric. Trust me, do this step BEFORE making any cuts. This fabric frays very easily and I learned the hard way.


I started by laying the drop cloth out on the floor. I live in a small apartment, and this is a LARGE piece of fabric, so I had to fold mine in half to work with it. I already had preexisting curtains (that I made) hanging in my entry, so to make measurement easy, I just used those for pattern. I also have two thin floor to ceiling windows that flank my front door, so I didn’t want these to be too wide. I would suggest using measurements for standard panels for larger windows, however. To make this easy, I folded my fabric in half again, so that when making my cuts I would end up with four even panels. Next, I folded and pinned the edges to make my hem lines. It felt so good to bring my sewing machine back out. There is something so peaceful about sewing that I find myself looking for more fabric to run through my machine when I run out.


So there you have basic beige drop cloth panels that look just like linen. If you want to dress them up a bit, I suggest adding a ribbon border or painting a pattern on them. Stripes or a bold design such as chevrons or even an oversized stamp would look beautiful. I have plans for these curtains in a friend’s house, so check back in a few weeks to see what I do with them.

Have you guys ever attempted making your own curtains? It can be a little daunting at first, but it actually is really easy!

July 16, 2012

Warming an Entry


In a rental, where walls are generally white, it’s important to warm things up with soft touches such as curtains, pillows, soft chairs, and clusters of art.

My entry is no exception. I live in a rental and our landlord doesn’t allow painting, (I may have broken those rules in my bedroom, but white is easy to repaint, and my bedroom is in the back of the house, so it’s not as obvious as the front room) so I had to come up with ways to make the area inviting, without overwhelming the small space. We’re lucky that we have four big windows in the entry, which keeps the room nice and bright, but to soften things up I needed to add a few things. I chose patterned curtains to incorporate a little color. These were made from fabric from IKEA that was on sale for $3 per yard. Across from the window I added a small table topped with a longer piece of wood to create a place to drop keys, store magazines and books and display art. I want a bold yellow chevron rug for the front door, but that will have to wait a little bit.

Underneath the windows sit two Goodwill chairs I bought years ago for around $10 each. I added a couple throw pillows (an old pillow with a $5 cover from IKEA and a round pillow I bought at a yard sale for $1) and the look was complete.


The shelving unit on the opposite wall is a story in itself; it was one of the original upper cabinets in my parent’s house when they bought it back in the late 70’s. They completely gutted the place (my dad’s a designer and architect and built the home I grew up in). In the process, they saved this lone cabinet and it now lives in my home as a bookshelf. If you can’t tell by now, I love pieces that tell a story and I hardly ever buy anything new. There’s no fun in new. (The arrangement needs work, try to look past that).


Above the bookshelf, I arranged art on the walls in a gallery style. You’ll recognize the two bulletin boards I painted last week. This wall also holds a frame made by my grandfather -- I'll be sharing that with you later in the week. I made the mirror, with the help of my Stepdad, a woodworking novice. We had so much fun making this mirror, which is just a $14 simple mirror from IKEA framed out in trim from the hardware store and backed with a sturdy piece of wood. A few years ago I stained it a warm chestnut, but painted over it in yellow as this entry needed a pop of color.


Of course, if you come to my house next week, things will probably look completely different. But changing things up is my idea of a good time, so I do it a lot. Just ask my roommate.

If you have any questions, or think I should do something differently, please let me know in the comments section.

Happy Monday, everyone; hope you all have a great week!

July 12, 2012

Anthropologie Archetype

Admittedly, the title is a bit of a stretch, but oh how I love a good alliterative combination. Anthropologie is by far my most favorite store EVER. Seriously, I would spend every single penny I had there if I had no bills and no financial responsibilities in life, but realistically I can only afford things when they go to the way-too-small Sale room.

One thing I have had my eye on for years is the initial oversized mug. Just like everything else in that store, I drool over it every time I step foot in there. But it costs $6. For.one.coffee.mug. And I'm pretty sure it used to cost about double that. So I decided to make my own, only using things I had laying around my house. So this project was 100 percent F-R-E-E.

Here she goes:


I started with an old holiday mug from Target a few years back that my mom gave me the last time I was home. (Every time I visit my Mom in Florida she tries to pawn off anything she no longer wants onto me. And I, being too weak of an individual to say no, begrudgingly take it and schlep it all the way back to Atlanta until I find something to do with it. Just kidding Mom, I LOVE it when you give me things!!)

I gave the mug a quick wash to remove any dust and applied multiple light coats of white spray paint. My personal favorite brand is Krylon, but Home Depot recently switched up its brand and now only carries Rustoleum, which I just don't like as much. But for this I used Rustoleum Paint and Primer in one in flat white. On second thought, a satin finish would be better for this project, but use what you have. I will likely go back over it with a clear sealant just to make it a bit shiny.

After it was covered and dried, the real fun began. Drawing on it! I just used a fine tip black Sharpie, but the possibilities of color and design are endless. I copied exactly how Anthropologie's looked since I loved it so much. Below you will see Anthropologie's version and mine underneath it. You shouldn't have a hard time telling them apart, because once again I am NOT an artist, but I'm really happy with the way it turned out! My intention with this mug is purely decorative, so it would not be safe to drink out of. If you want to use yours as an actual coffee or tea mug, you would need to buy a plain white ceramic mug. You can still draw on it with permanent marker and it will be dishwasher safe without messing up your design.


This would make an excellent gift for someone. I have been dreaming of doing two mugs for John and I that say "John's Joe" and "Danna's Decaf" for some time now. You could even add twine to the handles to dress them up a little. But that would probably be best for the merely decorative cups.

Has anyone attempted an Anthro hack of the sort? Or any other mug art for that matter? Tell me about it in the comments section!

Happy crafting and happy weekend everyone! I'll be back on Monday with a post about warming up an entry way, so make sure to tune in!

July 11, 2012

Stately

As a continuation of yesterday's post, I wanted to share one more piece of art I made using a bulletin board. This one makes me smile really big. Makes my heart all warm and fuzzy. It's a piece with F-U-N written all over it, and to me, that's what art in your home should be -- something that makes you smile when you look at it. I want the the things that surround me to make me happy, and this one totally does that. Alrighty, enough elaboration, let's reveal.

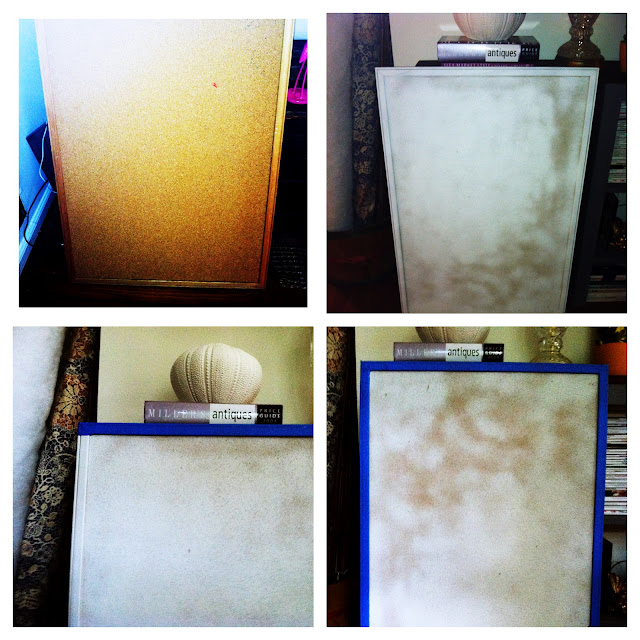
This project started similar to the last, but for this one I made it even simpler and used spray paint. I started with a blank bulletin board, painters tape, a marker, a paint brush and two colors of spray paint. First things first, I wiped down the board. This is a vital first step when spray painting (well this should really be done always). When pieces sit in storage, over time they collect dust. Nothing loves dust more than spray paint, and I can't tell you how frustrating it is to get a nice coat of spray paint on something only to find tiny particles of dust splotching up your work. So save yourself some time and wipe it down with a wet cloth.


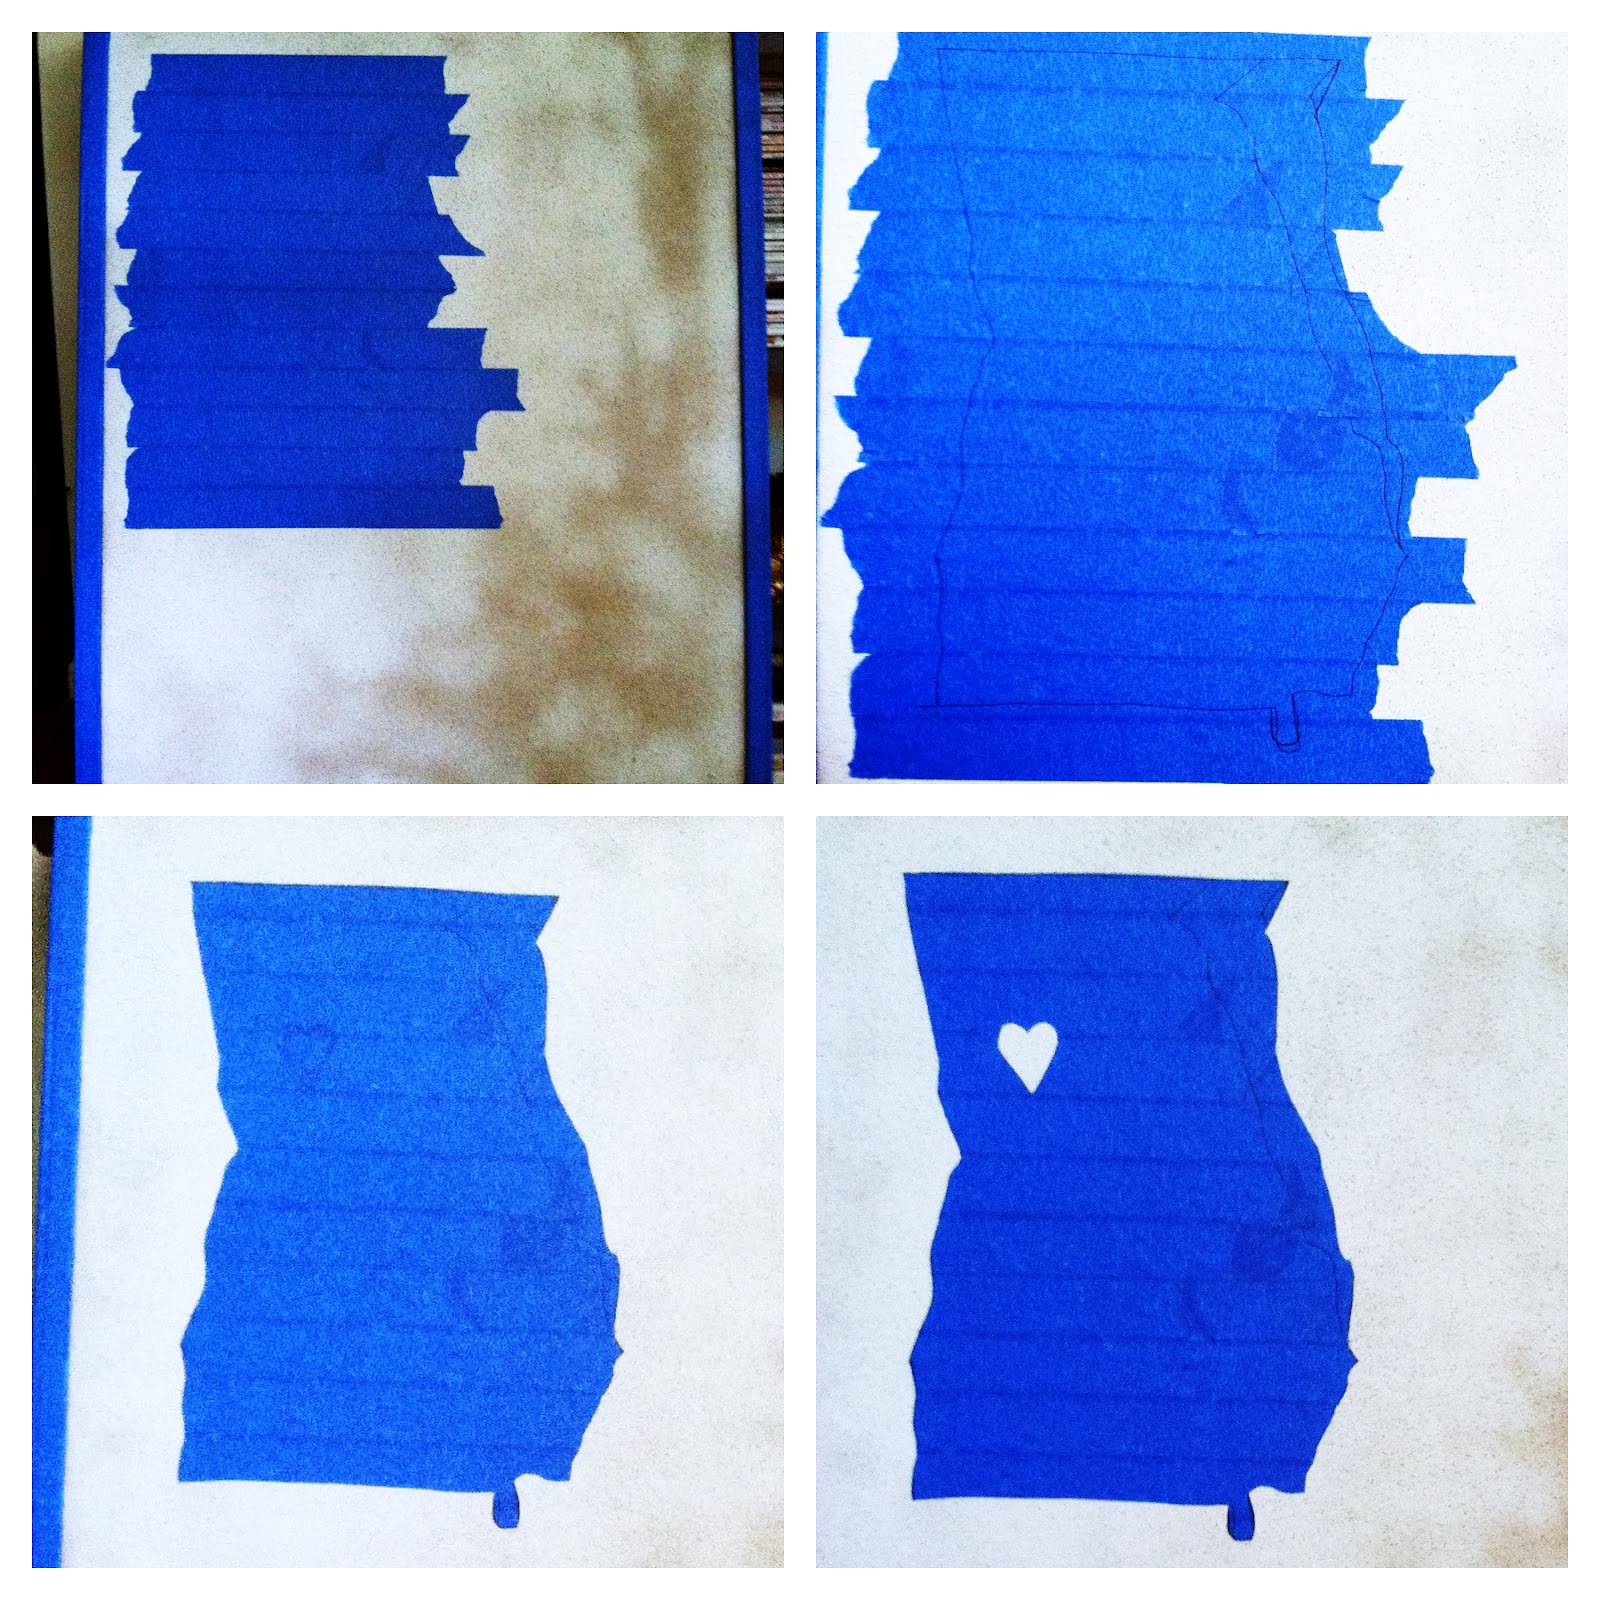
Next I gave the whole board and the trim a few light coats of white paint. If you've never worked with spray paint, you always want to do multiple light coats to avoid drips. After it was completely dry, I brought it inside and started taping off the sides, making sure not to get any tape on the quark part of the board. Next - this is where things took a change - I started taping off the top left section of the board as I had originally planned a small quote, but once I got the tape onto the board and took a picture for the blog, my mind switched gears. I suddenly saw my rectangular section of painters tape as the state of Georgia, my home state. With that, I knew the quote would have to wait. I started sketching out the state and making corrections until I was happy with my work. If you look closely, you'll see I'm no artist. Not.even.close. Then I decided to draw a heart over Atlanta (my city).


After I was happy with my drawing, I got the xacto knife out and carefully cut out my drawing. This is where quark becomes a dream to work with. You can slice it all up and no one will ever notice. I peeled the tape off being careful around the heart, and I was left with the above.


Then I just took my new baby outside (still unsure whether this was going to be great or a disaster) and gave it multiple light coats of dark gray. And I decided to paint the heart gold.


I was hopeful when I brought it inside after drying, but a little nervous. After I peeled off the tape I was left with the above. And if I didn't make myself clear earlier, I LOVE IT. So much. Here it is in all its glory:

Please allow me to apologize for the extremely low quality images, I am using my iPhone for all of these and an editing tool directly from my phone. It doesn't look splotchy in person, you'll just have to take my word for it. Eventually I want to get a camera and learn some jazzy photoshop skills, but until then the iPhone will have to do.

Thanks for reading! Have any of you guys done a similar project? Would you try this? Leave a comment and let me know!